Search smallrig.com...


Should You Get a Full Cage or Half Cage for Your Camera?
SmallRig 2026-02-28 04:40:53
Contents
Choosing between a full camera cage and a half cage comes down to how you shoot. Full cages offer maximum protection and mounting points for complex rigs, while half cages keep things light for run-and-gun work. Understanding what each does best helps you pick the right setup for cameras like the Sony A7IV or Sony FX3.
What's the Real Difference Between Full and Half Camera Cages?
Full cages wrap around your entire camera body, while half cages only cover the top and sides. This fundamental design difference creates a ripple effect across protection, weight, functionality, and price. Let's break down what actually matters when you're deciding between them.
Detailed Comparison:


| Feature | Full Camera Cage | Half Cage |
| Protection Coverage | Surrounds entire camera body with metal framework | Top and side protection only, bottom and back exposed |
| Weight Added | ~190g for a typical mirrorless full cage | ~115g for a typical mirrorless half cage |
| Mounting Points | Multiple 1/4" and ARRI 3/8" threads, plus 2 cold shoes | Multiple 1/4" and ARRI 3/8" threads, plus 1 cold shoe |
| Battery Access | Must remove cage or use quick-release base plate | Instant access without removing anything |
| Button Access | May block some controls, requires adaptation | Maintains access to most native controls |
| Price Range | ~$70–$90 for many mirrorless cages | ~$40–$70 for many half cages |
| Rigging Capability | Supports full production setups (monitors, follow focus, matte box) | Handles basic accessories (mic, small light, handle) |
| Best Use Cases | Studio work, commercial shoots, complex lighting setups | Street photography, travel, documentary, weddings |
| Heat Dissipation | Can trap heat around camera body | Better airflow around camera |
| Gimbal Compatibility | Often too bulky for gimbal mounting | Usually works with gimbals if designed properly |
Full cages win on versatility and protection but lose on convenience and weight. Half cages do the opposite. Neither option is objectively better—they solve different problems.
How to Pick the Right Camera Cage for Your Shooting Style?
Start by honestly assessing what you actually shoot, not what you think you might shoot someday.
Evaluating Your Primary Shooting Style

Walk through your typical shoot day. How often do you change batteries? If it's every ~100–110 minutes of actual video recording on a Sony camera, removing a full cage gets old fast. Do you switch between tripod, gimbal, and handheld multiple times per project? A lighter half cage makes these transitions smoother.
Determining Required Accessories and Expansion
List the accessories you use on every single shoot. Then list the ones you use occasionally. A half cage handles one or two regular accessories well—think a shotgun mic and maybe a small LED panel. Once you're regularly using three or more accessories simultaneously, or you need specific positioning for a follow focus system, you've outgrown what a half cage can do efficiently.
Balancing Protection and Mobility
Full cages protect better, but that protection matters most in specific scenarios. Studio environments with lots of equipment moving around? Protection is worth the weight. Traveling light or shooting in cramped spaces? The extra bulk creates more problems than it solves. Consider where your camera takes the most abuse and whether that risk justifies carrying extra metal everywhere.
Budget and Value Considerations
Quality half cages from reputable brands often start around $50–$80, though some models can be found for less depending on the camera and retailer. Full camera cage systems can start under $100 for many mirrorless bodies, but a more complete “cage system” (handles, mounts, clamps, quick-release parts) often climbs quickly past $200. If you're unsure which you need, starting with a half cage makes financial sense. You can always upgrade later, and decent half cages hold resale value. Buying a full cage you don't use hurts more than buying a half cage and occasionally wishing for more mounting points.
What Makes Camera-Specific Cages Different?
Generic cages fit multiple camera models using adjustable components. Camera-specific cages, like a dedicated Sony A7IV cage or Sony FX3 cage, are machined precisely for one camera body. This precision matters more than you might expect, and that's why you should choose a dedicated camera cage.
Sony A7IV Cage Configuration
The A7IV's button layout and port placement mean a purpose-built Sony A7IV cage won't block the mode dial or make cable routing awkward. Generic cages might cover ports you use frequently or make accessing the flip screen annoying. Purpose-built options cut around the A7IV's specific design, so everything stays accessible where Sony intended it.

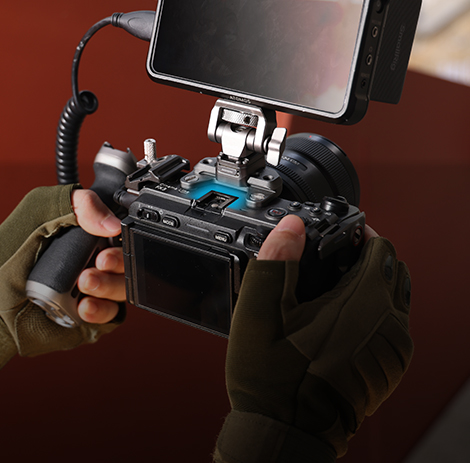
If you’re trying to stay lighter while still adding clean mounting points, a concrete example is the SmallRig Camera Half Cage for Sony A7IV: it’s built to retain the camera’s grip feel, uses a two-point locking system to reduce shake, and adds an Arca quick- release plate for quick tripod-to-stabilizer transitions.
Sony FX3 Cage System Building
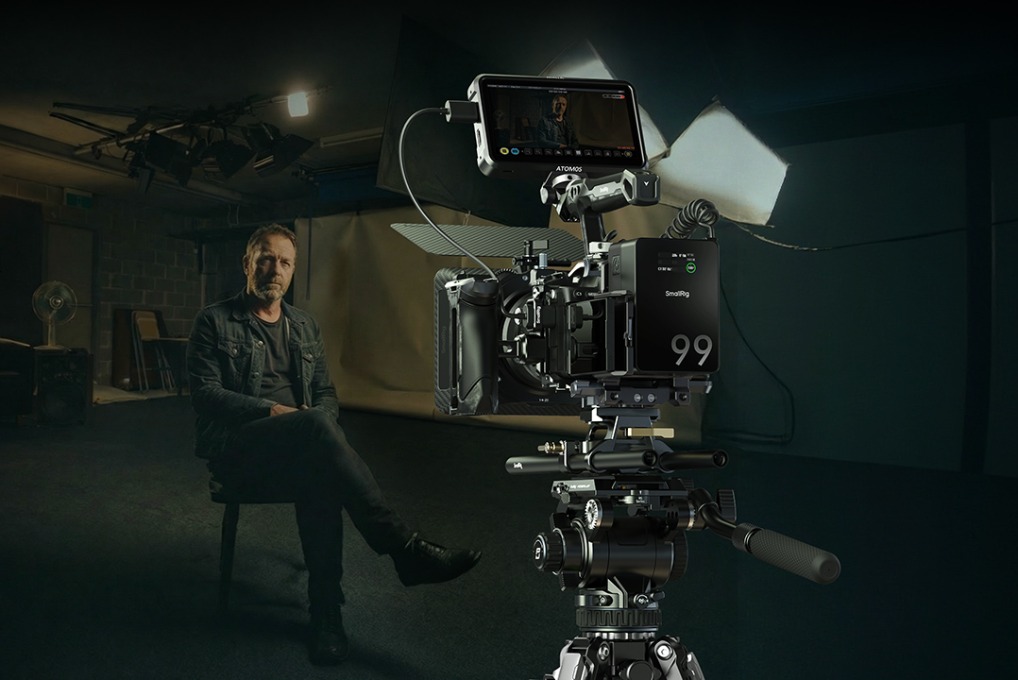
The FX3 is already a cinema-style body, so a Sony FX3 cage typically goes full coverage. These cameras get used with serious rigging—XLR adapters, follow focus, and external monitoring. FX3 cages often include NATO rails, ARRI rosettes, and other cinema-standard mounting systems. The cage becomes the foundation for a complete production setup rather than just protection.

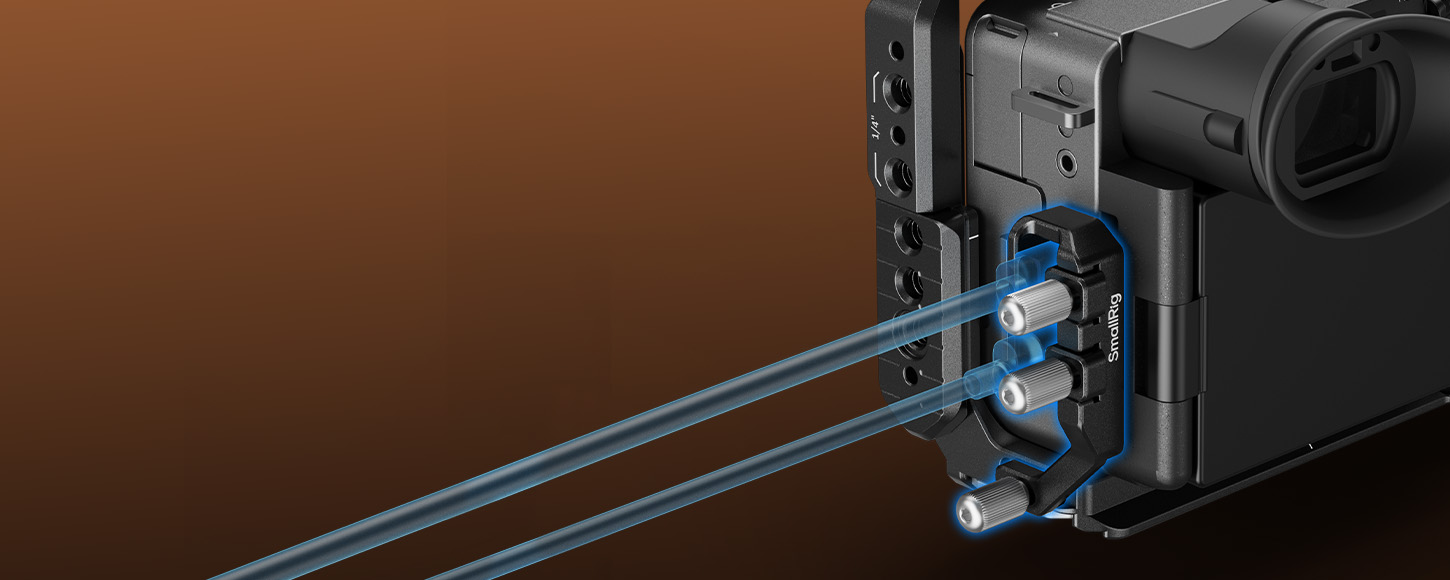
For a real-world example, the SmallRig Cage for Sony FX30 / FX3 uses a modular design with a removable NATO rail, supports the original XLR top handle, includes a dedicated HDMI cable clamp for stable signal transmission, and builds in an Arca-Swiss quick-release plate for fast DJI RS-series gimbal / Arca-Swiss tripod mounting.
Universal vs. Camera-Specific Design
Universal cages cost less and work across camera upgrades. Camera-specific cages fit better and look cleaner, but become useless when you switch bodies. If you change cameras every few years, universal makes sense. If you're committed to a specific system for the long term, camera-specific cages are worth the investment. The better fit quality and more thoughtful port access pay off over thousands of shots.
How Do You Actually Install and Use a Camera Cage?
Installing a camera cage isn't complicated, it can solve common shooting problem, but doing it right the first time saves frustration later. Most cages attach via your camera's tripod socket using a thumbscrew or hex bolt. Make sure it's tight—a loose cage shifts during shooting and throws off your framing.
Installation Steps and Key Considerations
-
Remove your camera strap before installing the cage. Straps get trapped under cage components and become impossible to adjust.
-
Thread the main mounting screw through the cage base into your camera's tripod socket. Tighten firmly but don't overtorque—you're threading into metal or plastic, and stripped threads ruin your camera body.
-
If your cage has side brackets or top handles with additional mounting points, attach those next. Align them carefully so they're not twisted or crooked. A cage that's slightly off-center looks unprofessional and can interfere with buttons or dials.
Common Accessory Mounting Solutions
Position your most-used accessories on the strongest mounting points. Heavy items like monitors should mount to multiple points if possible, distributing weight across the cage structure. Smaller accessories like mics can use single cold shoe mounts.
Keep cables organized—running HDMI and power cables through the cage's cable routing clips prevents snagging and looks cleaner.
Balance Adjustment Tips
A properly rigged camera balances naturally in your hand. After adding accessories, hold your camera the way you normally shoot. If it's front-heavy or lopsided, reposition accessories until it feels balanced.
For gimbal work, balance is critical—an unbalanced rig fights the motors and drains batteries faster.
Frequently Asked Questions
Q1. Can You Use a Camera Cage With a Camera Strap, and How Do You Attach It Properly?
Yes, but it requires planning. Most cages block your camera's built-in strap lugs, so you'll need alternative mounting points. Many quality camera cages include dedicated strap attachment points on the sides or top handle. Peak Design Anchor Links work well with these mounting points and let you quick-release your strap. Another option is running your strap through the cage's side rails, though this isn't as secure. For heavy rigs, consider a neck strap that attaches to multiple points for better weight distribution. Never trust a single mounting point with expensive gear—always use two attachment points when possible. If your cage doesn't have strap mounts and you need one, look for cages with integrated top handles that include strap lugs.
Q2. Do Camera Cages Interfere With Autofocus Performance or Camera Sensors in Any Way?
No, camera cages are purely external and don't affect autofocus, image quality, or sensor performance. They're mechanical accessories that mount to your camera's exterior without touching internal components. However, poorly designed cages can block your camera's focus assist light or interfere with the viewfinder if the top portion sits too close. Some cages with handles might cast shadows on your lens at certain angles with the pop-up flash, but this only matters if you actually use the built-in flash. The cage itself won't degrade image quality. It's aluminum or other metal that sits outside your camera body. If you notice focus issues after installing a cage, it's coincidental timing, not causation.
Q3. Will a Camera Cage Void My Manufacturer’s Warranty if Something Goes Wrong?
Installing a cage itself doesn't void your warranty since you're just using the camera's standard tripod mount. However, if the cage causes damage—like over-tightening the mounting screw and stripping your camera's tripod socket—that specific damage wouldn't be covered. Normal cage use is considered an external accessory and doesn't affect warranty status any more than mounting your camera to a tripod. Keep your original packaging and documentation. If you need warranty service, remove the cage first and send just the camera body. Manufacturers won't refuse warranty service because you used a cage, but they will refuse coverage for damage directly caused by improper accessory installation.
Conclusion
Full cages suit photographers and videographers building comprehensive production rigs. Half cages work better for mobile shooters who value quick access and light weight. Match your camera cage to how you actually shoot, not how you think pros shoot.
If you want a clean “start light, scale up later” path, SmallRig’s camera-specific cages are an easy place to begin—pick a cage that preserves access to the controls/ports you use daily, then add only the modules your real shoots prove you need (monitor mount, handle, cable clamp) instead of overbuilding from day one.
Keep Reading
 Fujifilm X-M5, X-T50 & X-E5 Cages & Cases — SmallRig Complete Guide 2026
 How to Build the Perfect SmallRig Rig for Sony A7V
 Why Your Camera Rig Feels Loose and Wobbly
Related Products from SmallRig