Search smallrig.com...


Why Your Camera Rig Feels Loose and Wobbly
SmallRig 2026-03-26 19:02:51
Contents
A loose monitor, a shifting handle, or a mic mount that slowly rotates can ruin a shot and slow down a crew. In most cases, one connection is slipping, and the rest of the build amplifies it. The fastest fixes come from three moves: reduce leverage, improve contact surfaces, and tighten in a consistent order. Do that well, and a DSLR rig stays solid through handheld movement, long takes, and repeated repositioning.
What Causes a DSLR Rig to Feel Loose and Wobbly?
Rig wobble usually comes from one weak link. Identify whether the movement is caused by leverage from stack height, poor thread seating, or clamp friction that’s slipping, then fix that exact interface.
Stack Height
Every added layer increases leverage. A riser, a spacer, a ball head, or a long extension turns tiny play into visible movement. If your DSLR rig felt fine yesterday and started wobbling right after one new accessory, the added reach is a prime suspect.
A quick mental check helps: look at the distance from the anchor point to the accessory’s center of mass. A longer distance means higher torque on every joint. Tightening harder often hides the issue for a short time, then the wobble returns.
Thread Wear
Camera support gear commonly relies on 1/4-20 and 3/8-16 threads. Over time, repeated assembly, cross-threading, dirt, and over-tightening can wear threads or damage a fastener. That leads to a joint that feels snug but still rocks or clicks.
Clues that point to thread trouble:
-
The knob tightens smoothly but never feels like it seats firmly.
-
You can reproduce a click at the same spot each time you push the accessory.
-
The connection loosens quickly after a few minutes of movement.
A worn screw is often the weak link. Replacing the fastener can restore a firm seat faster than chasing the problem elsewhere.
Clamp Slippage
Clamps rely on friction plus alignment. A clamp can feel strong at first and still creep during a long take if the jaw faces are not fully seated, the surface is dirty, or the load pulls at a strong angle. This is common when a clamp mount holds an accessory far from the clamp body.
Clamp slip usually shows up as slow rotation, gradual sag, or a small shift that keeps coming back after you “fixed” it.
How Do You Diagnose DSLR Rig Wobble With Quick Checks?
Once you know the likely causes, isolate the exact joint. These checks are designed to locate the moving point quickly, then lock it down without over-tightening. This is the fastest way to stabilize a DSLR rig on set.
Shake and Listen Test
Hold the camera body or camera cage firmly so the base cannot move. With the other hand, apply a small, controlled push to one accessory at a time. Listen and feel for the signature of movement. A sharp click often points to a thread joint. A faint squeak often points to clamp friction breaking free and re-gripping.
Use a short sequence so you do not miss the obvious:
-
Monitor or EVF mount point
-
Camera arm joints
-
Mic or wireless receiver mount
-
Any super clamps or clamp mount interfaces
When the wobble appears, keep your hand on that connection and repeat the push. If the movement disappears while you hold it, you have found the target.
Re Torque Order
Tightening order matters because tension transfers through stacked parts. Tightening the outer accessory first can trap a small gap deeper in the stack, and that hidden gap continues to work loose.
A reliable order:
-
Camera to plate or cage base
-
Plate to tripod head, shoulder base, or rails
-
Handles and core grips
-
Extensions and camera arm joints
-
Clamps and end accessories
After each step, test again. Stop when the movement is gone. Extra force after that point increases the chance of thread damage.
Contact Surface Inspection
If a clamp is involved, inspect the actual contact surfaces. Dust, oil, tape residue, and worn pads reduce friction and can cause creep. Also, check for deformation. Bent, cracked, or dented load-bearing parts should be replaced before the next shoot.
This table helps you choose a first fix that matches the symptom:
| Symptom you see | Most likely source | Best first action |
| Bounce increases with reach | Stack height or arm flex | Shorten reach, move the load closer |
| Slow rotation over time | Clamp slippage | Clean surfaces, reseat jaws, reduce torque |
| Click even when “tight” | Thread wear or poor seating | Clean threads, replace screw, check seating |
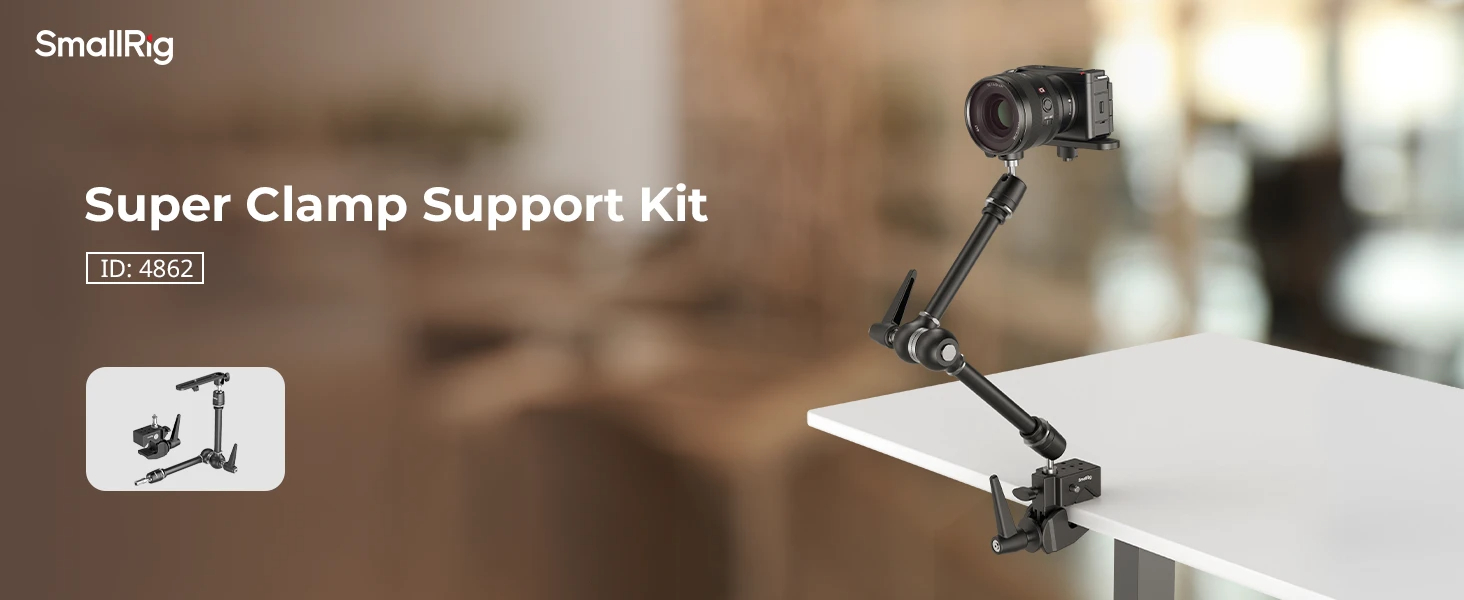
Why Super Clamps and Clamp Mounts Stabilize a DSLR Rig

Clamps stabilize a build by creating a strong anchor point on a rod, rail, stand, or handle. The stability comes from two mechanics: correct jaw contact and resistance to rotation. When those are handled well, super clamps and a clamp mount can remove the loose, floating feel that shows up in accessory-heavy setups.
Clamp Jaw Alignment
Jaw alignment decides how much real friction you get. If the jaw faces only touch on an edge, the tightening force is wasted, and the clamp is more likely to creep. Aim for full face contact with the clamped surface.
A fast check works in the field: after tightening, apply a firm hand twist in the direction the accessory will be loaded. If it moves, loosen and reseat the jaws before you add force.
Anti-Rotation Setup
Friction alone can fail under vibration and torque. Anti-rotation features add locating elements that resist twisting, such as pin-based interfaces or parts designed to key into a matching recess. If an accessory tends to rotate even when tight, this is often the missing piece.
This matters most for monitors, wireless receivers, and microphones. A few degrees of rotation can force frequent readjustments and make your DSLR rig feel unreliable.
Safe Load Placement
Load placement often matters more than load weight. A small light far from the clamp can create more torque than a heavier item mounted close to the anchor.
Three placement rules stay reliable across setups:
-
Keep the accessory’s center of mass close to the clamp body
-
Keep the load low and centered when possible
-
Follow each component’s rated payload, especially for arms and clamps
If you rely on super clamps to move fast, treat leverage as a primary control. Reducing reach is one of the quickest ways to stop creep.
How Can You Use a Camera Arm Without Adding Flex?

A camera arm is useful for positioning monitors and small accessories, but it introduces multiple joints and increased reach. Flex is usually a geometry and locking issue rather than a defect. The fixes below focus on keeping a camera arm stable while still allowing practical adjustments.
Arm Length Choices
Length drives flex. Longer reach increases torque on every joint and makes the system feel springy. When you see bounce, shorten the reach first. Moving an accessory a few inches closer can do more than tightening every knob.
If the screen needs to sit farther away for viewing, consider changing the anchor point. Mounting higher or closer to the camera’s centerline can improve sightlines without extending the arm.
Joint Lock Points
Arms typically have two ball joints and a central locking mechanism. One slightly loose ball joint can make the entire assembly drift. Joint angle also matters. Gravity pulling across a joint fights the lock more than gravity pulling into it.
A consistent habit helps: hold the accessory in its final position while tightening so it cannot twist during the last turns. Then apply a firm push test. If it shifts, adjust angles and reduce reach before adding force.
Cable Strain Relief
Cables can create “fake looseness.” HDMI, SDI, USB-C, and audio cables can pull on a monitor or receiver during pans and tilts. That pull can rotate a mount and make it feel like the hardware is loosening.
A simple approach reduces strain:
-
Leave a small service loop near the accessory
-
Secure the cable to the cage or handle so the connector is not carrying a load
-
Route cables away from knobs and moving joints
Done well, this reduces drift and helps a DSLR rig stay stable through long takes.
Build a Repeatable Check Routine So Your Rig Stays Solid
Most wobble problems repeat because builds change daily, so consistency matters. Run the same quick routine before you roll: scan for cracks, bent parts, or deformed clamp faces, then wipe clamp jaws and rails if anything feels slick or dusty. Tighten from the camera outward in the same order each time, and finish with a brief shake and listen check on every accessory. Before you hit the record, confirm cable strain relief and make sure no line is pulling on a mount.
FAQs
Q1: Should you use threadlocker on a DSLR rig?
Threadlocker can help with connections that stay assembled for a long time. Use a medium strength, removable type on a clean, fully seated threaded connection. Keep it off parts you adjust frequently, such as camera arm locks, clamp knobs, and any joint that relies on friction washers. Follow the adhesive maker’s instructions and avoid contact with plastic parts and moving friction surfaces.
Q2: Why do clamps creep during long takes?
Creep usually comes from low friction at the jaw interface combined with torque from leverage. Dirty surfaces, glossy coatings, jaw misalignment, and long reach are common triggers. Cleaning, reseating, and moving the load closer to the clamp body usually fixes it faster than extra force.
Q3: How tight is “tight enough” for knobs?
Tight enough means the accessory does not move during a firm hand test in the direction it will be loaded. If it still slips, change geometry or contact surfaces. Continuing to increase the force raises the risk of stripped threads and damaged friction parts. When the same checks happen every time, wobbles become easier to catch early. Super clamps, a clamp mount, and a camera arm can all be stable tools when leverage, contact, and tightening order are handled consistently.
Keep Reading
 Fujifilm X-M5, X-T50 & X-E5 Cages & Cases — SmallRig Complete Guide 2026
 How to Build the Perfect SmallRig Rig for Sony A7V
 Can a Camera Cage Scratch Your Camera? How to Prevent It